
I built a new winter garden and I love it!!!
To set the stage for this project let me lay out the situation:
1. My spring and summer garden doesn't get enough sun during the winter, so a new garden is a must.
2. I have an ugly utility pole on the side of my yard where the new garden needs to go.
3. My budget is nearly nonexistent.
4. The Garden Friendly Dogs necessitate a fence around the garden.
5. It hasn't rained in two months and the ground is like cement, so digging post holes is not an option.
6. James is swamped at work, therefore I will be sole designer and carpenter.
Yikes!! Tough parameters to work within, but I am determined!!
Solutions:
1.a. Select area that gets lots of winter sun. Send off soil sample of chosen area.
2.a. Incorporated ugly utility pole into overall garden design.
3.a. Build fence out of free pallets.
4.a. Build fence sturdy enough to hold up 80 lb. Fred.
5.a. Build fence in the strongest geometric shape that can't fall over once it's connected to itself - the circle!! Use fake posts that sit on the ground not in it!
6.a. Thank God for power tools and a dad that taught me how to use them.
We're off to the races!
Step 1:
 |
| Use a jigsaw to cut the top of the pallet boards into points for your picket fence. |
 |
| Remove extra boards from the back of each pallet to lighten its weight., but leave enough boards to maintain the integrity of the pallet/picket section. I used a crowbar and hammer for this step. |
 |
| This first step takes you from pallet to picket!! I needed thirteen pallets for my fence and one for my gate. |
 |
| Build six wedge shaped raised beds out of cedar. The wedge is 4 ft. across the back, 6 ft. down the sides, and 2 ft. in front. |
Step 3:
 |
| Attach one picket section to the back of each raised bed. Pallets are usually 4 ft. long and fit nicely on the 4 ft. back of the raised bed. Attach with screws. Remember this fence is going to hold itself up! |
Step 4:
 |
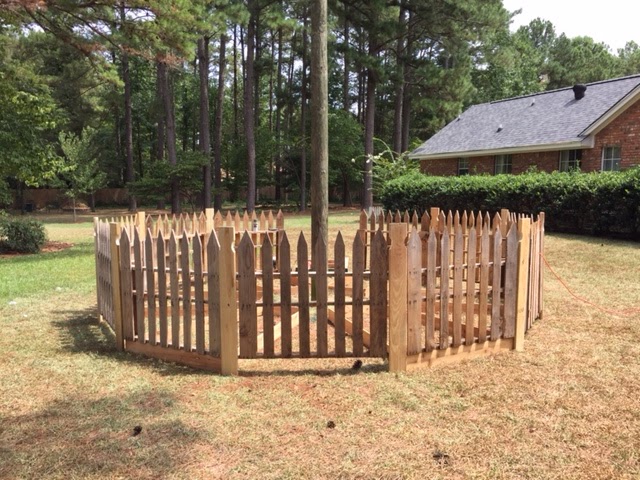
| Arrange raised beds with their picket sections into a circle. Notice my ugly utility pole in the center. It now has a a reason for being there and no longer looks so out of place. Also notice that I have placed a plain picket/pallet section between each raised bed section. The weird section in front is my funky gate pallet; we'll talk about it later. |
Step 5:
 |
| Cut twelve faux fence posts out of treated 1 x 6 boards. Mine are just a bit taller than the pickets. Attach these "posts" to either side of the raided bed picket section. I used L brackets for this. Then attach another picket/pallet to the post. * This pallet will not have a raised bed to sit on, so it will be suspended six inches above the ground. As you continue to assemble the fence, between each raised bed section will be a suspended plain pallet section. |
 |
| Close up of simple L bracket attachment. I used two at the top and two at the bottom. I hammered the 90 degree angle of the bracket into whatever angle I needed. |
Step 6:
 |
| Keep attaching pallet sections as you move around the circle. It was no nice to be able to pull and shove this fence as needed to make the parts fit together. It was very sturdy and will be even sturdier once the soil is added to the raised beds. If necessary I can stake the small ends of the raised beds for added strength. |
And that's it!!! Not a single post hole dug!!
 |
| Inside view |
 |
| Outside view |
Now all that's left is paint, gate, and soil. More pictures when that's all done!!
Love ya'll,
Shelli
Sweat is the cologne of accomplishment.
~Heywood Hale Broun
No comments:
Post a Comment