Showing posts with label Projects. Show all posts

Thursday, November 17, 2016

Another Dog Hair and Potato Peelings Project

One fall, many years ago, I was happily decorating my house and set a little pumpkin atop a stack of favorite books on a side table in the den. It added a sweet, casual touch. Several weeks later a noticed  that sweet little pumpkin looked a little smaller than it had originally. Upon closer inspection, it was smaller because it was rotting and its insides were oozing all over the back of my books. Yuck!!

That's about the time Hobby Lobby started selling fake pumpkins and I quit using real ones in certain places. It was a great investment. Today I still use many of those same pumpkins, but a few of them have faded in the sun or gotten nicked and scratched so that their white foam insides are showing. I decided I should just throw them away and buy new ones, but then I went to Mama's.


Out on her front steps sat this beautiful pot of fake pumpkins. I asked where she had bought such pretty ones and she said they were old ones she had painted!!! She used plain craft paints and then sprayed them with a clear coat.


She painted a base coat with one color and sponged another color on top to get a more realistic result.


They are fabulous!!
Another great dog hair and potato peelings project!


And the best thing about the dog hair and potato peelings approach to projects is that you love the results so much more than something you just go out and buy.

Repurpose! Reuse! Recycle!

Love ya'll,
Shelli

Think left and think right and think low and think high.
Oh, the thinks you can think up if only you try!
~Dr. Seuss


Friday, June 17, 2016

Another Dog Hair and Potato Peelings Project

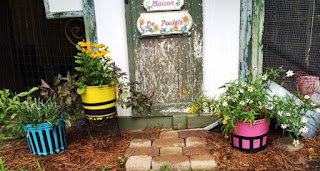
I recently decided to spruce up the chicken coop, it was looking a little bland. I thought some potted plants would do the trick, but did not want to go out and spend money on expensive pots. I get tired of wanting and buying things, so I decided to go the dog hair and potato peelings route.

What does that mean? It means looking around at what you've got and making something out of nothing. I had lots of black plastic containers from the nursery. I also had blue painter's tape and duct tape. Here's the process...

Wash the outside of the pots. I didn't even clean out the insides; after all, dirt was going right back inside.

Tape off designs keeping in mind that whatever you tape will be black.

Spray! I bought plain old cheap paint, but they do have some that is made for plastic.

Peel off the tape and plant.


Love ya'll,
Shelli

Reduce the complexity of life by eliminating the needless wants of life, 
and the labors of life reduce themselves.
 ~Edwin Way Teale

The simple joy of having just enough. 
~Dr. SunWolf

Frugality is one of the most beautiful and joyful words in the English language, and yet one that we are culturally cut off from understanding and enjoying. The consumption society has made us feel that happiness lies in having things, and has failed to teach us the happiness of not having things. 
~Elise Boulding

Wednesday, June 1, 2016

Such Great Friends!!

My sweet friends are so great!

When Olive was born so many of them were kind enough to remember our family at this special time by sending gifts. Katherine said, "Mom your friends are so great!", and it's true!!

Some of  them used their talents to make handmade gifts...

Kathy's bibs....

and her quilt.

Andrea's birth sampler

Sue's nursing cover

Jackie's crocheted sweater
 Receiving these precious handmade items made me wonder if  I could come up with a baby gift for a  boy or girl that I could make when my friends have grandbabies. I can crochet but only the VERY basic of projects. I can sew but nothing worthy of gift giving. I can garden but can't imagine giving a vegetable as a gift.

(Although I did work in Katherine and Collin's garden the week I stayed with them for Olive's birth. Katherine recently sent me this picture of Olive with a cucumber planted that week. I tried picturing the cucumber with a pink or blue bow on it and placed in a gift bag, but decided to return to the drawing board.)


Of course I turned to Pinterest where I found several great ideas for easy painting projects for new babies. Here's my first effort done for Jackie's grandson, Gabriel. It was lots of fun! Here are the simple instructions in case you want to try.

Start with a 18 x 24 inch canvas painted pale blue with ordinary craft acrylics.
It took three coats.

Now use a darker blue paint mixed with glazing medium for  glossy, semitransparent stripes.

This is an awesome product.

Now sketch a whale pattern to cut out of paper and traced onto the canvas.
You can always find an image online.

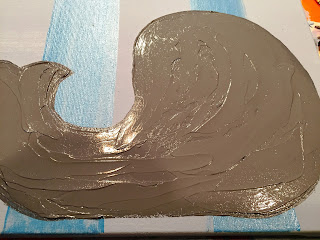
I used grey paint mixed with a heavy gel medium just for a wet, raised look on the whale.
Different textures make things interesting.


I painted the whale with a brush first, then used pallet knives to spread the thick mixture. This took about 18 hours to dry completely.  Then I added white highlights with glossy paint.

Wording, outlines, and done!!
Happy new grandson, Jackie!!!

Love ya'll,
Shelli

A loyal friend laughs at your jokes when they’re not so good, and sympathizes with your problems when they’re not so bad.
 ~Arnold H. Glasgow


Friendship is unnecessary, like philosophy, like art.... It has no survival value; rather it is one of those things that give value to survival.
 ~C.S. Lewis

Nothing but heaven itself is better than a friend who is really a friend. 
~Plautus

Monday, May 16, 2016

Madeleine's Mask


Madeleine, my niece, collects masks. We wanted to get her one for graduation, but couldn't find anything we were happy with so I decided to make her one. I went straight to Pinterest because, as James often says, I am the "knock-off queen".

I originally thought that I would have to make the mask itself. I pinned several ideas for making papier mache masks. One set of directions told you to use your own face for the structural contours of the mask. Imagining myself with Vaseline smeared all over my face and slimy strips of newspaper draping my nose, I shifted gears and began searching the Internet for places to buy paintable masks.

Now I was doing all this planning on my phone on our way home from New Orleans Sunday afternoon. I had four days to get this mask done while also trying to get my garden and yard ready for the Master Gardener's end-of-the-year tour (which is a whole 'nother story)!! I also needed to bake a cake for new neighbors that have just moved in up the road and the article for the newspaper was due this week, too. My stress level was beginning to rise, but I am hard headed and was determined to have a mask for Madeleine!

Any way, when we passed through Monroe, we stopped at Michael's and bought a mask form. This product could be used to help form a papier mache mask of your own making, or serve as the mask itself because it was paintable. Project saved!! Stress level recedes!!

Scrolling through examples of masks, I found that my favorites were the Day of the Dead masks also know as sugar skulls. I gathered several examples and laid out all my materials.


The mask for was make out of a weird material and was very smooth. I painted it with an undercoat of Gesso so that  it would have a more textured feel.


Then I drew on the designs which were an amalgamation of the examples I had printed.


Now it was just time to paint. It looks just like a third grader was doing it, but remember everything on a sugar mask is outlined in black which will make it all look so much neater.


See what I mean?!


When the paint was dry, I applied a clear, glossy coat.


A $5.00 bunch of fake flowers from Wal Mart hot glued to the top and the mask is ready to go to Dallas!


She loved the mask, and I love her! 
Congratulations, Madeleine!!


Love ya'll, 
Shelli


Friday, March 11, 2016

My Jackson Pollock

I recently talked about our trip to the Jackson Pollock exhibit at the Dallas Museum of Art. 

I love to go somewhere on a trip and then keep a memory of that trip out in the house where I can see it for a while. It's like bringing a tiny piece of the bigger world into our sweet little world here at TCG. Then, each time I pass by that memento, it whispers to me, "remember when we.......".  

Sometimes, that memory comes in the form of a painting and since Jackson Pollocks sell for millions of dollars, I had to make my own. 

Step 1: Ask your sweet husband to get you a large canvas(30' x 40') from Hobby Lobby when he is in Monroe. Apply two coats of  ordinary craft paint. Apply one final coat of craft paint mixed with a glazing medium.

Mask off a portion of the canvas with painter's tape.

Cover the outside border with butcher paper.

Place the canvas on the floor. Pollock said he became part of the painting when he put it on the floor because he could approach it from every side, rather than look at it on an easel.  Then just pour paint. I used a wide mouthed plastic cup. I preferred the Pollock pieces that had wider ribbons of color, so I was trying for that effect.  

Keep applying different colors always standing at a different place around  the canvas. I also used containers with smaller apertures to apply the paint, but all I ever did was just pour! If you want some splatter marks when you pour, hold your container way up high.

Let your work dry for a couple of days before removing the tape. I used a razor blade to lay on top of the paint next to the tape ensuring a clean removal of the tape.
  Now when I walk by the fireplace, I hear a faint whisper saying, "Remember how much fun we had in Dallas..."


Love ya'll, 
Shelli

We do not remember days; we remember moments. 
~Cesare Pavese, The Burning Brand

Tuesday, October 20, 2015

Tablescapes


Each October, Christian Community Action (CCA), the local food pantry, holds its fall fundraiser, Soup For the Soul. This year Soup For the Soul is introducing tablescapes.  A tablescape is a creatively designed table arrangement that highlights a specific theme.  This year's theme is "Celebrations."

Civic organizations, church groups, and individuals have "adopted" tables and chosen celebrations to portray. I chose St. Patrick's Day and Baby Shower and thought I would share some of my early prep work with you, but let me start by saying, "Thank you, Pinterest! Without you, none of this would be possible!"


St. Patrick's Day


So I started with a clay flower pot and large clay saucer that were painted green.


Next, I used painter's tape to mask off the rim of the pot which was then painted black.


Now all that's needed is a gold buckle! Pinterest said to use a cheap gold rectangular picture frame.  An arrangement of fresh flowers will go on top.


 Baby Shower

I bought a cardboard box and painted alternating sides pink and blue.


Then cut strips of white craft foam to edge the sides of the box.


Hot glued the edges on each side of the box.


Then glued on wooden letters that I bought at Hobby Lobby and painted white.  Balloons will be attached to the top of the box.


I bought pink and blue plastic plates at Party City to use as chargers.  The baby rattles were a party favor from Party City also. I glued two on each plate.
So there are my two centerpieces and I have other components to finish off the table.  I hope it all turns out well!!  I must also mention that the idea of using tablescapes was not original. We got the idea from my sister, Carole.  They do the same thing at her church in Mobile.  We even stole the theme from her group!

Soup For the Soul is tonight. I can't wait to see all of the creative tablescapes! I'll take lots of pictures and have them for you to enjoy later this week.

Love ya'll, 
Shelli